

FAQs
Product Questions
All of our products except for our retractable banners have custom size options. Select “Custom Size” on the product you are looking for and you will be able to type in your custom size.
There are three options for designing and customizing a product. Click a product on the left-hand panel and choose one of the options.
1. Custom Design: lets you customize the products. Click it to open the design studio and use multiple tools to create your own design.
2. Upload Design: using this option, you can upload your own JPG, JPEG, GIF, PNG, EPS, AI, PDF and PSD images.
3. Browse Design: use this to select hundreds of pre-loaded templates. Work on them or customize them through our design studio.
For our Standard Vinyl Banners, we have four (4) material options available.
Our most popular 13 oz vinyl is sturdy and lightweight and works well for most indoor and outdoor banners. Our new 15 oz vinyl is a little heavier and has a tighter weave of the reinforcing fibers giving a smoother look and will last longer than our 13 oz vinyl. Our 18 oz vinyl is thick and extra tough for heavier duty applications. Our Mesh vinyl banner is strong and light with ventilated flexibility.
Backdrop and Fabric Banners
We use a 9mil wrinkle resistance polyester fabric on our backdrop and fabric banners. It is machine washable and folds nicely for storage or transportation.
For yard signs, we have two (2) options available.
Our standard 4Mil fluted coroplast is the most common and we also offer a heavy duty 10Mil.
We offer two (2) options for Poster printing.
We have 200 GSM paper posters which are suited for indoor and smooth 300 GSM vinyl posters which are suited for outdoor application.
Our 14pt Natural Uncoated paper is a light cream, natural white color with a smooth finish. The stock has a minimum of 30% post-consumer waste and is FSC Certified, Forest Friendly.
Our 14pt Pearl Metallic paper is a unique stock that shimmers in light when viewed from different angles. The stock itself is embedded with Pearl fibers that give the paper an overall smooth, metallic look. Printing on this stock will give your CMYK colors a subtle shimmer. Please keep in mind that heavy ink desities or coverage may diminish the effect.
Our 18pt Super Plush Cards are printed on 16pt C2S stock with a 2mil soft velvet, scuff resistant lamination for a total thickness of 18pt. The soft velvet lamination adds a soft supple luxurious look and feel, which softens colors, reduces contrast and gives an overall lighter, muted appearance.
Are our 18pt Super Plush Cards waterproof?
The lamination makes them water resistan but not 100% waterproof. This mean that if they come in contact with a small amount of water you can easly wipe it off and they will be ok however, they cannot be submerged in water without water causing damage.
Our 32pt Uncoated Triple Layer Cards are made of three premium quality stocks adhered together creating an ultra thick and a colored core.
Face Stock : 9pt Bright White Premium Uncoated with a smoth finish.
Insert Stock : 14pt Premium Opaque Black
Our 32pt Uncoated Triple Layer Cards are easy to write on! We suggest requesting samples before placing your order.
Spot UV is when only a part of the card is super shiny. For example, if you have a logo that you want to "pop" we can apply UV just the logo and the rest of the card remains matte. Spot UV requires an additional file showing in black only the area for UV. When designing for Spot UV please avoid tight registration. Registration for Spot UV is + or - 1/10th of an inch. Do not use gradients on Spot UV Mask files. Mask files should be solid 100% K only and vector PDF files. Do not use rich black, this will cause a delay in production.
Coated papers are available in two finishes – gloss (shiny and smooth) and matte (flat and lusterless). Coated glossy papers reflect the light evenly so they are suitable for almost all types of printing jobs. Coated papers have a coating on them (typically clay), so they're “sealed.” This restricts the amount of ink that is absorbed into the paper, allowing the ink to sit on top of the paper, in a crisp defined dot. Examples of our coated papers are 100lb Gloss Text, 100lb Gloss Cover and 16pt C2S. We offer our 16pt with several finishes including a matte or satin coating.
Uncoated papers do not have a coating and thus are more porous. Many people refer to the uncoated paper as "matte" because it is dull and non-reflective, but for us, matte is a dull COATED paper. Examples of our uncoated papers are: 20lb Bond, 70lb Offset, 14pt Uncoated Cover, and 16pt Uncoated Cover
Uncoated papers are commonly chosen when the print job needs to be written on, for example, letterheads, notepads, and gift certificates. Coated papers are commonly used for full-color vibrant printing on items like brochures, catalogs, and postcards.
The type of paper used for different purposes is expressed in weight. In the countries following the European system, it is grams per square meter (gsm or g/m2 or simply g) and in the US system, it is Pound (lb).
The paper used for writing/printing (letterheads and such stationery and brochures) is generally between 60 to 150 gsm (20lb bond to 100lb gloss text) and is called the paper or text stock. Anything heavier than this we consider card stock, i.e. the paper used for business cards, postcards, greeting cards, etc.
Due to different screens being calibrated differently, the printed product may look different than what was displayed on your screen.
Our retractable banners include everything you need to display your banner. Our yard signs have optional H Stakes that you can select while building your product. We do not offer any hardware for our banners, but if you need help sourcing frames let us know and we will try to help.
All of our material is white, and we can print any color you like for the background. It all depends on the design you choose.
We will correct any errors we make in print size, product cutting, material damage, print image shift, printing delays and lost or damaged packages. Please notify us within 5 business days of receiving your order.
We use traditional offset printing or offset lithography, as well as the latest in high-tech dry toner and inkjet digital printing. The combination of these technologies allows us to print better, faster, and cheaper than anyone else in the business.
Yes we do! If you see the "Made in the USA" logo, IT IS!! Due to a lack of US suppliers, some of our materials and ad specialty products are sourced from outside the US.
Grain is determined during the paper-making process when fibers tend to align in one direction or the other. Paper is identified as either grain short (grain is parallel to paper's short side) or grain long (grain is parallel to the paper's long side), depending on how the paper is cut.
Grain can affect the feel of stiffness in a paper. When you fold WITH the grain, the paper folds easier, with less cracking. When folded AGAINST the grain it will feel stiffer, more rigid and more prone to cracking or breaking when folded.
We do our best to print all jobs with the best grain direction for folding however due to the gang-run printing process we cannot always guarantee grain direction.
For flat jobs, we do not guarantee grain direction. Some jobs may feel different, possible more flexible or even "thinner" from run to run even when printed on the same weight stock. This is because of a change in grain direction in the stock.
Example of folding AGAINST the grain

Example of folding WITH the grain

For more info on paper grain, please watch the video below.

Design & File Questions
Don't use low res!
Resolution, displayed as dpi (dots per inch) or ppi (pixels per inch), indicates the number of colored dots or pixels that make up one image. The higher the resolution, the clearer and better the resulting print will be.
All files and images must have a minimun of 300 dpi resolution in order to have a clear and high-quality prints.

Most images taken from the web are going to be low res at 72 dpi, we can’t turn a low res image to high res, so you have to make sure the image is bigger than the file you’re working with. Here’s how to do it:
1. Do a Google Image search, click the Search Tools button and then Size drop menu.

2. Here you can choose the size of the image results pixelwise, Large should work most of the times. Keep in mind, the bigger the image, the best it will look on the final print.
When you open the image on your browser, make sure that it covers the whole window, if it appears small then it's not suited for printing.


3. A formula you can use is multiplying your file size by 300. For example, if you want to cover a 3.5 x 2 business card, then your image should be at least: (3.5 x 300) x (2 x 300) = 1050 x 600 px large.
4. You can check an image’s dimensions on your computer by right clicking and choosing Properties on Windows or Get Info on Mac.


Other ways to get hi res images
- Take a photo with your camera or phone, make sure to set it at the highest resolution possible.

-Buy it from a stock image site. We recommend depositphotos.com

How to tell if I'm using low res in Photoshop
In Photoshop go to the Image > Image Size.

A window will pop up where you can check your image’s resolution.

72 dpi is good for web, but not for printing. 300 dpi is the minimun required to have
high-quality prints.
Our online designer will tell you! Just upload the image and it will display “High”, “Medium”, or “Low” Quality.
Please send us high resolution (300dpi minimum) PDF or JPG files. All layers should be flattened and all fonts should be outlined or embedded to avoid printing issues. Colors should be created in CMYK and any images embedded. Direct uploads are limited to a maximum file size of 50 megabytes. For larger files you may use dropbox.com or wetransfer.com by entering your Order Name on the upload page, then, choosing the "Upload Artwork Later" button as seen below.

Most online images are low resolution and not suitable for printing. If you are using the Google Search Engine, you can filter to large file sizes by clicking on “Show Options” and selecting large. We do offer a wide variety of imagery in our online designer as well. There are also free stock image sites likeunsplash.com that can be useful. Vector cliparts in the file format SVG are also compatible with our designer and can be found by clicking here.
Yes, we do! You can find our detailed Design Guide here. We also have many videos that can answer some frequently asked design questions. They are found here.
After selecting your product and choosing the "UPLOAD OR EMAIL YOUR PRINT READY FILE" button you will choose the button UPLOAD ARTWORK LATER on the following page.
Please keep in mind we need PDF or JPG files scaled to 150 DPI at final size, you should not send PSD files or 300 DPI files.
Please see the image below.

Once you complete checkout you will recieve an email from us asking you to reply with your files. If your files are too large to email you may send us a link to your files instead of the actual file.
For Google Drive (and DROPBOX), please email us a link to your file from the GET LINK or GENERAL ACCESS areas as seen in the image below. Please do not add our email address as someone with "Access" to your file.
Google Drive

Dropbox

If you do not have Google Drive or Dropbox you may send your file using the same method with most other mail services or you may use Wetransfer.com You do not need an account to use Wetransfer.com simply click on I JUST WANT TO SEND FILES as seen in the image below.
![]()
Enter our email and order number in the form when prompted and attach and send your files.

Click TRANSFER and you are finished!

- Safe Zone: All critical elements (text, images, graphic elements, logos) must be kept inside the blue box.
- Trimming Zone: Please allow 0.125 in cutting tolerance around your work.
- Bleed Zone: Make sure to extend the background images or colors all the way to the edge of the black outline (0.125 in).

When the artwork extends all the way past the trim line to the edge of the card, that's called bleed.

The space within the blue line is called the safety space and that's where all the important information and elements should be to keep them from being cut off.

- Incorrect: The background colors do not extend to the bleed zone. This could result in white edges after trimming.

- Incorrect: The text and logo are outside the safe zone. This could result in them being cut off.

- Correct: The background colors are extended to the bleed zone and all the important information is within the safe zone.
1. Go to impossibleprinting.com and select the project you need to work on in the Categories sidebar.
2. Download the project template in psd format.
3. Open the psd file in Adobe Photoshop and follow the guides, create your artwork in the Place your artwork here layer, make sure that any artwork and details you don't want to get cut-off should stay inside the blue line (safe zone).

4. Delete the Template Layer when done with the Artwork.

To Save a Print-Ready PDF
To save or export a psd file to PDF, go to file - Save as, change the Save as type: to Photoshop PDF. Click Save.


1. Go to impossibleprinting.com and select the project you need to work on in the Categories sidebar.
2. Download the project template in AI format.
3. Open the file in Adobe Illustrator and follow the guides, create your artwork in the Place your artwork here layer, make sure that any artwork and details you don't want to get cut-off should stay inside the blue line (safe zone).

4. Delete the Template Layer when done with the Artwork.

To Save a Print-Ready PDF
1. To save or export an Adobe Illustrator file to PDF, go to file - Save as, change the Save as type: to PDF. Click Save.


2. Leave everything at default, click Save PDF.

The back side should point opposite of the front. If the front points right then the back should point left.
When printing double sided products, like business cards, we do what it's called head-to-head where the top of both sides is alligned.
If you send us your files this way, the backside is going to be printed upside down.

This way both sides will be printed upright.

When you send us one side vertical, we rotate it 90° to the left, so make sure it's facing the right way otherwise, it will print upside down.


If you design your product vertically, you can send it to us that way and we'll make sure to flip it correctly before printing.

However, if you choose to flip it by yourself before sending it, please make sure to flip them as the next image shows to assure both faces are printed in the right way.


There are two types of black ink used in printing: standard black and rich black.
The standard black doesn't produce a really deep black color. If used in larger surfaces, they look a bit grayish. Professional designers mix other printing inks with the black ink to get what is called rich or deep black. We recommend a mixture of C=60 M=40 Y=40 K=100 (240% ink Coverage).

We avoid using Photoshop's black value (C=75 M=68 Y=67 K=90) since it goes above the maximun ink coverage of 240% resulting in a muddy looking black when printed.

When to use them
Standard black should be used for text and small areas to avoid overlapping colors. Rich black should be used for larger areas to get a darker black color.

If you have a heavy, dark, solid black bleed on 3 or 4 sides, please try to reduce the mix to 20/10/10/100 so there is less ink on the overall print job.
We print in CMYK while monitors produce color in RGB. Because of this difference we cannot gaurentee the colors will look 100% the same on your screen as on the printed product.

You should send us your files in CMYK mode since it's the mode used for color printing. If you send us a RGB file, there'll be a color shift when it's converted to CMYK and the printed work is going to look different to the one you sent.
The reason this color shift occurs, is because the RGB color scheme has a greater range of colors than CMYK, allowing it to produce more vibrant colors. Printing colors produced in RGB mode will come out darker and duller than they seem on the monitor. However, because of the greater range of colors RGB mode has, files shown in CMYK mode will always show up accurately on screen.

Here are some examples of how the conversion from RGB to CMYK can affect your images.


To get a better representation of how your final print will look, choose CMYK when creating a new file. Keep in mind, however, that an uncalibrated monitor may not match the finished print.
RGB (red, green, blue) is an additive color spectrum that represents the emittance of light, and when all the primary colors are combined, they form white. Computer monitors and other displays, use the emittance of light to create colors, and therefore, use the RGB mode. However, in printing, inks don’t work the same way. Since they don’t emit light. they use another colorspace to create colors. This new colorspace is the CMYK (cyan, magenta, yellow, black). The CMYK colorspace represents absorption of light and when all the primary colors are combined, they form black.
Due to these differences, it is impossible for certain colors on a screen to be printed, since the CMYK colorspace does not include all the colors within the RGB spectrum. However, you can properly display the CMYK colorspace on a screen, since the RGB colorspace covers it completely.
In this page, we'll tell you about a color shift thay may happen with the color blue and why there's a reason not to design for print in RGB. The range of colors that can be reproduced in CMYK mode is considerably smaller than the RGB range of colors reproducible on a standard monitor, so when the file it's converted to CMYK for printing, the colors will shift and lose vividness.

For example, most bright blues in RGB will turn purple when converted to CMYK because they're outside the range of CMYK colors.
Rather than trying to match that same bright blue, here are some blue mixes that you could use instead.

One way to avoid this color shift is not to use colors that show the gamut warning in the color picker since that means that the color is out of the CMYK range and will shift when it prints. If you click the warning icon, Photoshop will choose the closest achievable CMYK color.

Blue and purple are really close in the CMYK spectrum, so if you want to avoid your blue turning into purple always use a low amount of magenta and a high amount of cyan, make sure to leave at minimun of 25% difference in your Cyan and Magenta values.

With the use of transparencies in your design, you can create a lot of unique effects that look great on screen, but sometimes, they cause trouble when printed. These kind of problems are mainly present in Adobe Illustrator and InDesign, so don’t worry if you’re using Photoshop.
What are transparencies?
Transparencies are images or text that are "see through" or that show what’s behind them, but the name also applies to certain effects like shadows and glows.
Transparencies include:
- Transparency or partial opacity
- Lightening parts of images
- Making an object fade into another
- Mix colors
- Drop shadows
- Glows
- Feathering an image
- Placing files or objects which already contain transparency from another Adobe program.
![]()
To avoid any issues its best to flatten any element that uses effects like this. Also, please don't use transparency with spot colors, they will have unexpected results. Always convert spot colors to process for four color printing. Additionally, it may help to have a solid white box on your canvas as the bottom most layer. This "white box method" is not a standard fix, but we have seen it solve some issues with transparencies.


Thank you for understanding that if you fail to follow these guidelines and have an unexpected result, we cannot be responsible for the outcome.
Here’s how transparencies look on screen
![]()
And this is how they look in printing when you don’t flatten or rasterize them.
![]()
If your gray color didn't print gray it's most likely because there are using C, M or Y values other than K in your color mix or image and the color will vary. To eliminate the color shift make sure your gray is made up of only a porcentage of black.
To eliminate all values other than K in an image use your Channel Mixer (adjustment layer) in Photoshop, then click "Monochrome" and adjust accordingly.
There are different ways in which Pantone colors affect how your job prints.
The first is using Pantone (PMS) colors in a job that is printing in a full-color process. Many Pantone colors do not have an exact process color match; this will cause the color to shift when the software converts it from PMS to CMYK. It is best to use a Pantone Color Bridge and create your colors according to the Bridge Color that best matches your desired outcome. Below are some examples of color shift when converting from Pantone to CMYK.

You may purchase a Pantone Color Bridge here.
If your job must print in a PMS color, we do have the capability to print in PMS, just keep in mind that it will more than likely increase the cost of the job over CMYK by 50% to 100% or more. You may request a quote here.
The second way Pantone colors can affect the way your file looks is by using images with transparency. This means using effects like drop shadows and glows on top of the Pantone colors.
Here’s how they look on screen


And here is how it will look on printing


Here is what an image with transparency looks like on screen
![]()
Here is how it will look like printed
![]()
So make sure to convert all your Pantone colors to CMYK before saving and fixing all the color changes that may occur. You could also flatten any image or object that has an effect or transparency to avoid these issues.

To speed the printing process we use a machine like this to cut many sheets at the same time. During the process the sheets may shift so it's very common that any border designed too close to the cutting line will look uneven in the printed product.
.

Because of this, we highly recommend that you don't design with borders and if you do, make sure they are at least 1/4" inside the trim zone or 3/8" inside the bleed zone. However, we still can't assure the borders will be even. For example:


Incorrect: Here the border is at less than 1/4" inside from the trim zone or at 3/8" inside from the bleed zone.

Correct: Here is what your file, incluiding the bleed should look like for the best results. The border is at least 1/4" inside from the trim zone or at least 3/8" inside from the bleed zone.

Thin borders may look uneven. The thicker the border, the better it will look.


Our cutting tolerance is 1/32 of an inch at either side for a total visual effect of 1/6.
If we cut business cards one at a time, our name would not be PrintDirtCheap

With Cold Foil you can turn a wide range of CMYK colors into multi-colored metallic foils. Cold Foil uses a special processed foil system that is applied under a 4 color process to create an array of foil colors. It's simple, affordable, and makes your prints stand out from the rest!
For a Cold Foil job, you must include a Foil mask file along with your CMYK file. The mask file indicates where the Cold Foil will be applied. The file setup is the same as Spot UV. Use 100% K where Cold Foil needs to be applied and white where Cold Foil is not applied.

As shown above, the file on the top left is the normal CMYK print file. If you want the text and glasses to be foil, then your Foil mask file should look like the file on top the right. The white indicates no Cold Foil and black 100% K indicates where the Cold Foil will be applied. All artwork must be uploaded in separate files.
Here are some more things to keep in mind when creating your Cold Foil Mask:
Make sure the mask file and CMYK print file are aligned. They should match exactly in size and position. Cold Foil works best on lighter colors. The darker the CMYK color, the less vibrant the Cold Foil effect will be.
Do not use very thin fine detail or small text. Use San Serif fonts above 12 point for best results.
If you have Cold Foil applied to a white area, it will have a plain silver Foil look. If you would like plain silver foil to print, make sure to have at least 15% K in the CMYK print file area in order to obtain the highest quality silver Cold foil effect.
For better quality we recommend creating mask files in vector based programs such as Illustrator.
Watch our tutorial videos here: vimeo.com/239707655
We can only do one type of foil per job, Gold, Copper or Silver. Foil job mask files are set up just like our Spot UV mask files. You must provide a separate Foil Mask File: Black in the areas you want the foil and white in the areas you do not want the foil. All black areas should be solid 100%K.
If you order a Foil Stamped card with Spot UV, you will need to provide a separate Spot UV mask file, in which case you may need to provide up to 6 files. Please keep in mind that the foil and UV coating can't overlap, both should be at least 1/16th of an inch apart to avoid foil peeling off.
Also, avoid using small fine text or lines for foil objects. For best results, please make sure that the foil coverage is less than 50% of the entire print side.
Please be aware that there may be up to 1/16th of an inch shift on the placement of the foil. Keep this in mind if you are trying to align foil with other printed artwork on your card.
For better quality we recommend creating the Mask Files in vector based programs such as Illustrator.

Watch our tutorial videos here: vimeo.com/239830291
A font is a set of text characters in a specific style. Is recommended to make your fonts around 8-12 pt so they can be easy to read.

A problem that occurs very often when the fonts aren't embeded in the document, is that the style you chose for your designs gets substituted by a default one or rasterized, making it look pixelated. This happens if the computer where your file is opened doesn’t have the exact font you used.


From time to time, any type of font can have a problem. To 100% avoid substitution or raster in your fonts, the least you can do is embed the fonts to your file, but we recommend to outline your text (Illustrator) or flatten the image (Photoshop).

Illustrator
Go to Type>Create Outlines

Photoshop
Layer Options>Flatten image


Keep in mind that after outlining your text, you will no longer be able to edit what it says, so you should keep a backup file that you can edit in case you need to make some changes later on.
When creating a Spot UV job you must include a Spot UV Mask file along with the print File. The Spot UV Mask File is used to show where the UV coating needs to be applied.
For better quality we recommend creating the Mask Files in vector based programs such as Illustrator.
Please only use 100%K to indicate where you would like the UV. DO NOT use shadows, glows or grayscale images. White areas indicate no UV.

Please watch our tutorial videos here: vimeo.com/239830291
The higher resolution, the better! If you aren’t sure between two files, the larger file size is probably the safer choice. We support PDF, JPG’s, JPEGs, and PNG’s. Files should be in CMYK color mode. Images that are oversaturated, meaning they contain for than 250% total percentages of CMYK may print with unexpected results. Avoid using Photoshop's black value (C=75 M=68 Y=67 K=90) since it goes above the maximum ink coverage of 240% resulting in a muddy looking black when printed.
If you need graphic design, our minimum charge is $35 for any changes needed. For an exact quote email us the files, let us know what you need changed, and we will be more than happy to quote it for you. It's likely we will be able to edit/change the file if it is in its original format (photoshop, etc.)
Bi-Fold Brochures


Bi-fold brochures are one of the most popular types of brochure you can find. These are made out from one sheet of paper folded in half. This folding forms 4 panels: a front cover, a back cover and two internal pages. There are also catalogs and multi-page brochures that are made by stacking multiple sheets of paper and then folding them. The folding line can run along the shortest side of the sheet or the longest.
Tri-Fold Brochures

A very popular type of brochure, trifold brochures are made by folding a sheet of paper two times. To fold it, looking at the inside, you fold the right panel inwards and then fold the left panel so that it sits on top of the right panel. This type of brochure has 6 panels, 3 inside panels, and 3 outside panels, that are almost the same size (one of the panels is slightly shorter so it can be folded inside the other two without overlapping).
Roll-Fold Brochures

Roll fold brochures are made of a sheet of paper with three fold lines that make four panels on each side. Roll fold brochures have two large panels of the same size, followed by a smaller one and then an even smaller one. You start by folding the smaller panel inwards and continue in that direction.
Z-Fold Brochures

Also called fan fold or zig-zag fold, the z-fold brochure is similar to the trifold in which both of them are made by folding a sheet of paper three times, resulting in 3 outside panels and 3 inside panels. What makes them different, is that in the z-fold, one panel is folded inwards and the other one outward, in the shape of the letter Z. Since the panels don’t fold into one another, they’re all the same width.
Double-Parallel-Fold Brochures

A double parallel brochure has three parallel folds that make for eight panels (4 on each side of the sheet of paper). In this type of brochure, the sheet of paper is folded in half and then folded in half again so that one-half of the sheet is inside the other half. This makes the panels of the inside half to be smaller
French-Fold Brochures

French Fold brochures have 2 perpendicular fold lines in the form of a cross, reason why they’re also called right angle fold. Following this folds, the sheet of paper is first folded in half horizontally and then vertically. This brochure has 4 panels on each side.
Gate-Fold Brochures

The gatefold is a type of brochure folding that has two parallel folds to create six panels, three outside panels, and three inside panels. The side panels are roughly half the width of the center panel and fold inward without overlapping. This type of brochure is not that common, which is why they can make a great impact.
Double-Gate-Fold Brochures

Double gatefold brochures are very similar to gatefolds, except that they are folded one more time along a central crease. This achieves a narrower size. The central fold makes it, so it has now 8 panels (4 inside and 4 outside), dividing the large central panel in 2.
Half-Fold Then Tri-Fold Brochures

This type of folding has a central horizontal fold line and two vertical fold lines, which divide the paper into 6 panels, front and back. This brochure folds in half horizontally and then folds like a tri-fold brochure.
The size of the font depends on the design choices and size of your product. For example, if your banner is 3 feet tall and the text is about 1/3 of the height you see on your screen, then the text is about 1 foot tall.
We require all files meet the specifications in our Design Guide. If they do, a proof should not be necessary so, we do not send proofs by default. If you would like to add a proof to your order, you have several FREE proofing options. You can find them under our Poofs section.
We save files for 36 months. If you have an exact reorder, you can create your order online as usual and reference the previous order number. If your past order was longer ago we may still be able to retrieve your file; please contact us for details. Some older archived files may be subject to a recovery fee.
We recommend checking with your internal graphic design department to check if there is one on file. You can also check out fiverr.com and view a range of graphic designers that can create a logo for you for a reasonable cost.
PUBLISHER
If you’re creating your files in Publisher, make sure to save it in PDF so that we can open your files for printing.
1. Go to File > Export > Create PDF/XPS Document

2. Type the name of your file
3. For Save as type, choose PDF
4. Click Options and for the publish option choose either High Quality Printing or Commercial Press, to make sure you’re sending us the best quality file possible

5. Click Ok and then Publish.
WORD
If you’re using Microsoft Word the steps are pretty much the same.
1. Go to the File tab

2. Click Save as

3. In Save as type choose PDF and type your file name

4. Choose the location and click Save
If you have professional vector files these will give you the best image. We support SVG and PDF vector files. If you do not have access to these file types then GIF or PNG will give you the next best quality when provided at final size and at a minimum of 150 DPI.
If you have already uploaded your design and clicked continue, you can proceed to the final page of your cart and from there click EDIT on your design. There is also a DELETE button. If you are in the checkout process as a guest, you will need to add your address info to get to the final page.
Placing an Order
Our online Design Studio functions very similarly to professional design software. You can upload and crop images and logos and add text and other graphic elements. Watch the short video below for more on using our Design Studio.


Once the order has been submitted you will receive an email confirmation listing your final order details along with a link to your order online.
Be sure to check your junk email folder. You can also double check by logging in online and clicking “My Account” to view your orders.
In order to have the quickest production times possible we move orders forward within 15 minutes of receipt. If you have just placed your order and want to check if changing is possible please call us immediately at 833.993.0304
Please view our Terms and Conditions.
3-4 business days from proof approval. You can select a quicker turn around time like Next Day or Same Day production for an extra charge. Some of our products have a 5-6 production time as well as 3-4. Keep in mind that this time does not include shipping time. Business days are Monday thru Friday. Saturday and Sunday do not count as production or shipping days. Also it is important to keep in mind that all custom jobs have a longer production time which will be provided by our estimating department when quoting your job.
10AM in the destination city, on the day of the order. If your artwork is not camera ready your order will be delayed. Production times are in business days, i.e. Monday thru Friday. We guarantee turnaround times ONLY on camera ready files that have been created using our templates. A few of our products have later cut-off times, such as our Impossible Products, and these are indicated in the product description.
No. We are set up to process on side at a time. This requires that each side of a job just be on a separte file. You must submit a FRONT and a BACK as a pdf or high resolution jpg file.
Please note. If you are ordering multi-page copies, digital prints or booklets then all pages must be in order in one single pdf file.
Shipment/Delivery
NOTHING!! Our printing prices listed online already include shipping to the 48 continental US states. Simply pick the delivery date that fits your schedule! If you need your order shipped to Alaska, Hawaii, Puerto Rico, or Canada, we can arrange that for a small additional fee. Please reach out to Customer Service before placing your order.
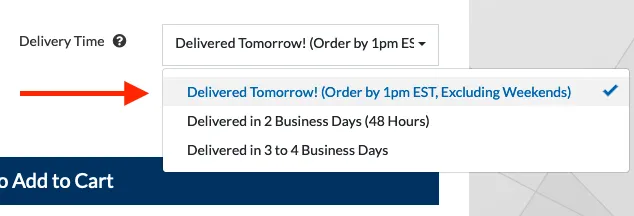
At Impossible Printing you choose how fast your order will ship when you choose the "Turnaround" option in the pricing calculator. If you need your order tomorrow, choose "Delivered Tomorrow" There are also two other option: "Delivered in 48 Hours" and a more economical option: "Delivered in 3-4 Business Days"
It is possible to ship some products outside the US. Please inquire with our customer service reps before placing your order. Keep in mind that printed products can be very heavy, especially in large quantities, and shipping costs can be rather high. Some examples of products that are more reasonable to ship might be banners or short-run business cards.
We do not ship to P.O. Boxes.
As a standard, we do not group ship items because of the different sizes of packages in which each item will ship. For example, a box of 1000 business cards will be about 4" x 2 1/2" x 16" long, and that cannot be boxed with an 8.5 x 11 sheet label sticker order. When possible, we might group ship, but we cannot guarantee that your jobs will ship together or arrive on the same day with the same carrier. We DO guarantee your order will arrive on or before the order due date found on your receipt.
Due to varying production schedules and multiple production facilities, we cannot determine the location where your job will be produced once your order is placed. Therefore we do not offer local pickup. We do not charge any additional fees for shipping, so if you need your order in your hands tomorrow, just choose "Delivered Tomorrow" for your turnaround time. We can even ship to your event venue or hotel if needed.

We calculate estimated delivery date as total production days + total shipping days = estimated delivery date. Note : Weekends and Holiday are not included. Ground may be +1 day. Rural Areas may be +1 day. Only Next Day & Second Day are guaranteed by shipping company.
Blind shipping means that our name is not on your package, instead it has your name as the return address. This option is available for our verified resellers only.
You can check your order status and tracking details by clicking the link in your confirmation email or logging into your account and viewing your order details.
We ship large trailers of packages at one time. Sometimes the tracking details do not update until the shipping company makes their first scan, sometimes up to 12 hours after we ship. If you recieved a shipping notice but the tracking has not updated, please check back later in the evening for an update. If your tracking number still has not updated by the following morning, call us at 833.993.0304
If your package is broken open or crushed, imediately open the package and inspect your banner for damage. If you find tears or other serious damages you can refuse delivery and we will ship you a new banner right away. Take a picture of the package and the damage and email us at info@impossibleprinting.com
Sometimes you may find wrinkles on the corners or edges of your banner, especially on clean cut banners, that are easily removed with a blow-dryer or warm steam iron. Because this is easliy fixed we do not reprint banners because of wrinkles.
You select the printing time as you build your product! Order must be placed by 10 AM for that day to count as a production day.
Billing/Account Information
Yes, if you choose all your chosen product's options the final price will display in the pricing calculator as you see below. The shipping is based on the service requested and you choose this below the product price.

Visa, MasterCard, American Express, and Discover. We also offer PayPal Checkout.
We offer specials and discounts in our VIP Club.
For the design of the card itself, there will be a one-time $45-$90 graphic design charge. We require payment for this before design is started, but guarantee satisfaction on the design. If it is not to your satisfaction, we will make adjustments until it is. For every set of business cards with a new name and picture, there is a one-time $20.00 typesetting charge. The typesetting charge covers any typesetting, proofing, correction and reproofing required. For example, the first order of 500 business cards will cost $25.42 plus a $20.00 one-time typesetting charge with a total of $45.42. The following reorder of the cards will be $25.42 flat because the business card file will have been saved and print-ready. You are paying for this service, so the design belongs to you once we create it. You can always use your design for future orders placed through impossibleprinting.com
We offer refunds for returned products that have a manufacturing defect. Please view ourTerms and Conditions.
Preliminaries
This solution will make your company run more efficiently and profitably by streamlining your business processes, maximizing your resources and eliminating redundant operations.
Online Printing System is a prepress process that bridges the gap between online digital content and commercial print production. The process allows a print house, a client or a graphic designer to create, edit, and approve computer-based online templates during the prepress phase. This process increasingly calls for a Portable Document Format (PDF) workflow environment with output provided by digital printing.
